How to Make Outstanding Graduation Celebration Cards
0
Posted on 15th August 2024 by Joel
Filed under Graduation Cards
With graduation season in full swing across the country, we wanted to share a couple of amazing graduation-themed hand-made card designs that were created with our range of card making supplies.

Option one is a great introductory piece that subtly praises the person receiving it but has unique elements that resemble a graduation mortar board, unlike any other card.
Option two is a more complex project that involves creating a pop-up middle. This gives it more presence on its shelf but comes with a grander celebration of your loved ones' efforts and successfully earning a degree diploma.
Each guide comes with detailed instructions on what you will need and how to use it to create the card in question, but don’t be afraid to improvise and change elements if you feel the new ideas will be better received. Additionally, if you want to make them both, then decide; we will start with option one below.
Option 1: Mortarboard Graduation Card Guide
This unique design is themed around the iconic mortarboard traditionally worn by graduates during the diploma ceremony. The bold design and inclusion of a tassel bring a textured feel to your card that will make it even more special for them, also, the mortarboard element can be lifted to reveal your heartwarming message underneath. This subtly designed piece comes with a lot of dignified class and is guaranteed to be treasured by the graduate in later years.
Required Materials and Tools
- White Card Pain 250gsm
- Black Plain Card 250gsm
- Gold cord for the tassel
- Brad for the tassel to go through (steps 7-8)
- Sentiment stamp with the words ‘Congratulations.’
- Versafine ink – Onyx black for the stamp
- Scoreboard and boning tool
- Whole punch
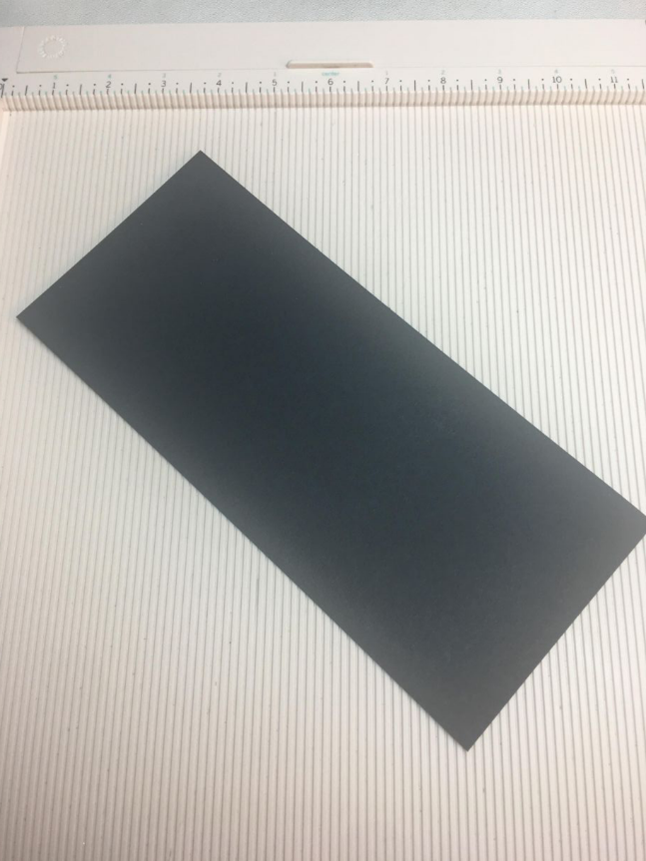
Step 1: Prepare the Hat
First, take a piece of black card stock and cut it into 4 ¼” x 9 ¾”. Next, using your scoreboard, score it widthways at the 5 ½” mark.
Then, add marks at 2 1/8” on either side of the above mark (above and below) on both sides and score a diagonal line from each of the lines above and below the 5 ½” score line. See the image for step 1 below for more detail.
Add two more score marks at 2 1/8” one of the top (short) sides, then cut from that mark at each edge to create the point of the mortarboard hat.
Step 2: Shape the Mortarboard
Fold the scored card inwards and watch it easily collapse to make the pointed part of the hat visible. Use the honing tool on the creases to make them really sharp and tight.

Steps 3 – 6: Create the Display Sentiment
Then, take a white piece of card and cut it 4 ¼” x 5 ½”. Use a pencil to make a mark at 2 1/8” on the middle of the short edge) and then on either side of the long edge at 3 ½” from the bottom of the card.

On each side, draw a pencil line from the side marks to the mark at the top to create a point. This is going to slip into the black card to create a white contrast. Using black onyx ink stamp the “Congratulations” sentiment along the bottom.

Step 7-8: Adding the Tassle
Make a hole at the crossroads centre of your black card and set a black brad using your hole punch tool. After making a knot at one end, thread a piece of gold cord through the hole and secure it with a piece of double-sided tape (don’t worry if it looks ugly, as you will cover it with a piece of white card afterwards).

Step 9: Final Touches
Finally, cut a piece of white card 2 3/4” square and attach it to the underside of the ‘cap’ to cover the tape for the tassel. Next, attach the white piece of card to the black base. You should have something like this.

Option 2: Fold-Out Graduation Card Guide
This other design is more complex but is well worth the effort as it is a real standout piece of card craft. With both interior and exterior decorative elements to support the 3D nature of its pop-ups, you’re bound to get a big reaction when they open this one.
Hannah Williams supplied this guide to us, and by following the instructions, you should end up with a card they’ll truly love.

Required Materials and Tools
- 300gsm White Cardstock (12"x6", 11.75"x5.75", 5.7"x5.7", 4.9"x1.1", 4.3"x5.43", 2.43"x5.43", 4.04"x5.43")
- Rose Gold Non-Shedding Glitter Card 285gsm(A4 Pack of 5)
- Charcoal Sparkled Pearlescent Card 300gsm(A4 Pack of 10)
- Blue Moon Cocktail Double Sided Pearl Card 290gsm(A4 Pack of 10)
- Printer & White Paper Plain 135gsm (for printing design for the front on)
- Anita’s PVA Tacky Glue 60ml
- Stick it! 3D Foam Tape 18mm
- Double Sided Sellotape 25mmor Tape Roller
- Yellow/Gold Thread
- Score Board
- Cutting Mat, Craft Knife & Set Square/Ruler
- Scissors
- Bone Folder/Smoother
- Coloured Markers
- Templates: listed in the guide below
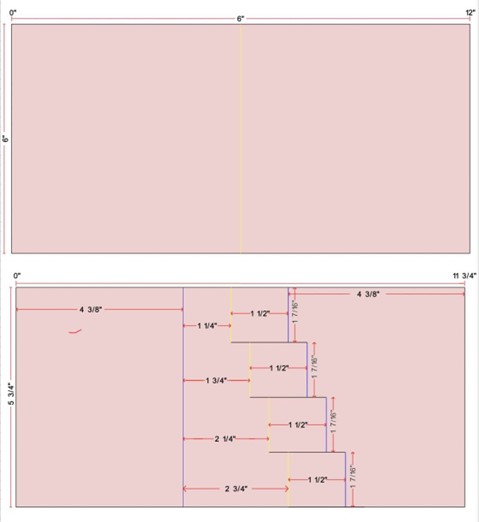
Step 1-4: Prepare Cutting Templates
Once you have all of your supplies together, you should start creating your templates. First, you should look at the template above and use this with your scoreboard to mark your lines. The lines in Yellow are Mountain folds, and the Blue lines are valley folds. If there are any black lines you should cut with a craft knife, the image below shows what you should be left with.
I created this on 300gsm white cardstock. Once you have scored and cut all the appropriate lines, fold and crease using a bone folder to enhance the folds.
After doing this, cut out your next pieces (leave the 'V' piece until later) using the template for the measurements from the Rose Gold Non-Shedding Glitter Card 285gsm, shown below:

Step 5-6: Folding the White Interior
Once you have cut and scored the piece from the template, you should take another piece of 300gsm white cardstock. This should be cut 12" x 6" and scored at the 6" mark to create a 6" x 6" square card when folded.

Steps 7-10: Interior Decorations
Once you have all the pink glitzy pieces, stick all of them down except for the four small squares (1.12" x 1.18") using double-sided tape, ensuring that they are centred in place.
Next, take the Charcoal Sparkled Pearlescent Card 300gsm and cut out four pieces that measure 1.32" x 1.38". These will be stuck down on the blank spots of your card shown above; you can then stick the four pink glitzy pieces you saved earlier on top of the black, making sure they are centred.
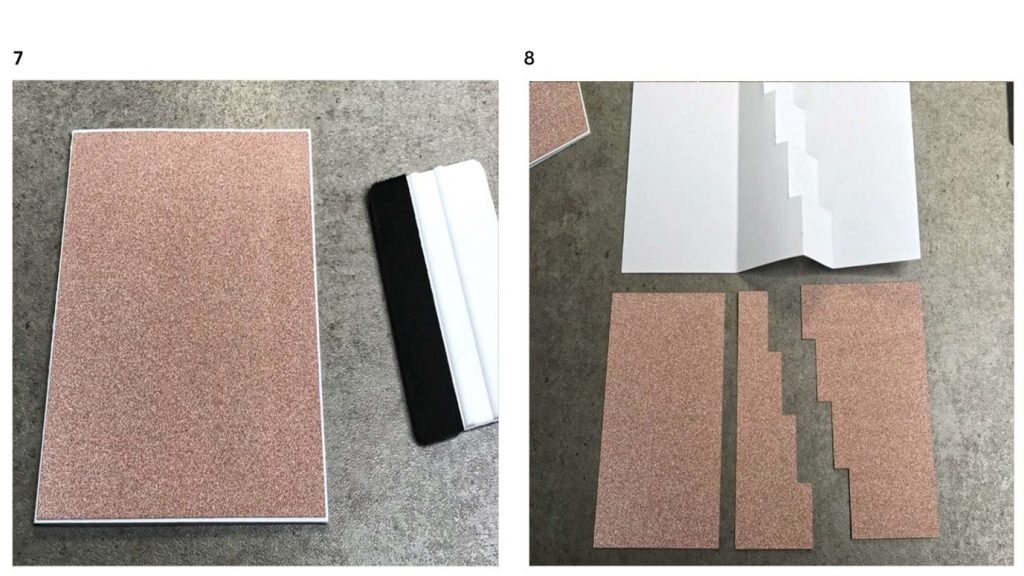

Image Assets for the Outside of the Card
Now for the outer part of the card. You should have your 6" square white card with the pink glitzy piece stuck down on top. You will now need to print out the graduate drawing onto some high-quality printer paper, making sure that the square outlined measures 5.5"; you can ensure this by importing this template or saving the image below into pages or Word and sizing it up or down until you end up with the square is 5.5". Once you have it sized, cut it out and stick it on top. You will also need to print out these: Template 1, Template 2, Template 3, Template 4. Make sure that you size up the images as you did before. The ones below are visual examples of the downloadable ones listed, but feel free to make any changes you feel would help.


Steps 11 – 12: Decorating the Outside of the Card
Stick the graduate drawing onto the 6" square card and take the flag in both the pink glitzy card and the white one you just printed. Lay them on top of each other centrally by placing the end flush on both, as shown in the image. Once you have done this, take your Stick it! 3D Foam Tape 18mm and place a few strips on the back. Stick this on the front of the card above the graduate image shown below.

Steps 13-14: Assembling the Pop-up
Next take the other white pieces you printed and stick them on top of the inside piece, ensuring they are centred, as shown below.

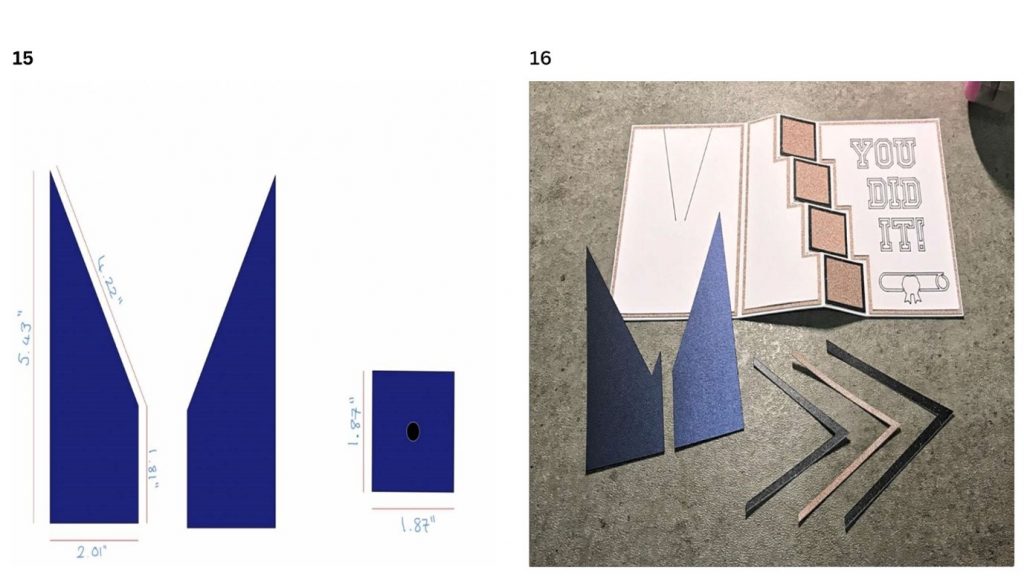
Steps 15-18: Making the Cap
Next, cut out the pieces from the template shown below in the Blue Moon Cocktail Double Sided Pearl Card 290gsm. These will form the cap and gown; once you have cut them out, lay the triangular shape onto the white, as shown below. The 'V' pieces you didn't cut out before can either be cut from the template or you can cut multiple strips 0.2" in width and lay them flush with the robes until you create 3 'V' pieces in both the black and pink glitzy card (shown in the image below). Trim any hangover until it looks just right.

Steps 19-22: Final Touches
Next, let's work on the cap; for this, you will take the small square you just cut out on the blue moon card. Take some gold thread and wrap it around four fingers multiple times until you have a good amount. Once you have done this, snip the looped ends so you end up with multiple pieces, and tie this together with a single piece of thread to make sure they don't fall out. You will then bend this collection of thread in half and tie another piece around the centre to create your tassel. Secure this to the back of your cap with some glue or sellotape. Once you have done this, stick your cap onto the gown, as shown in the image below, using double-sided tape.
This step is optional, but it enhances your card. Fill in the text that was printed on the white card pieces with some fun colours; I used pro markers, but just use whatever you have.
Finally, put some double-sided tape on the back of the inner piece, making sure to only put this on the piece that has the cap and gown portion and the piece with the 'You did it' message on, as shown below. Don't put any tape on the stepper part of the card.

Once you have put the double-sided on the pieces required, you can now stick this onto the 12" x 6" card, making sure that this is centred. If this is done correctly when you open the card, the stepper piece will pop up and lay flat flawlessly.
I also cut out the numbers for the graduation year in the black sparkle card with a craft knife, but how you do this is up to you; you could draw this on top of the pink sparkle or print out the numbers and stick it on; this is up to you.

Celebration Card Craft Supplies at Papermill Direct
At Papermill Direct, we have built a broad stock of coloured cards, blanks, and tools to guarantee that we have something to improve on in any project. You'll find all the arts and craft supplies you'll ever need in our online store, but if you're struggling to find what you need, contact us directly, and we'll help you find it.


Nobody has commented yet
Be the first to comment on this article by using the form below.