Heartfelt Thanks Card - Step By Step Tutorial
1
Posted on 23rd May 2016 by Angela Dodson
Filed under Card Making Ideas, All Papercraft Tutorials, Design Team

Hello, it’s Angela here to share another Step by Step card tutorial. This week the Design Team are working on the theme of ‘Pinterest Inspired’ and I’m using this card pinned here as my inspiration. From this design I decided to choose the trio of embossed shapes on bright backgrounds and bird as elements for my own card.
Step-by-Step:

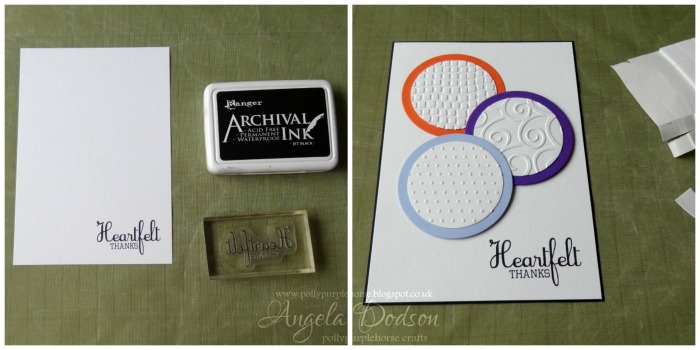
Using nesting circle dies, cut 3 from Papermilldirect White Linen card and 3 larger ones from papermilldirect coloured cardstocks (Mandarin Orange, Dark Violet and Marine Blue). Emboss the white linen circles using 3 different effect embossing folders.
Cut a panel of PMD White Linen approx. 4 5/8” x 6 5/8” and stamp sentiment of ‘Heartfelt Thanks’ in bottom Right corner using black Archival ink, mat onto slighter larger panel of PMD Black card. Glue embossed white circles onto coloured card circles and then arrange onto card front as shown. When happy with layout, glue top circle to card base and then add the other circles using 3D foam pads, allowing each circle to overlap the previous one.
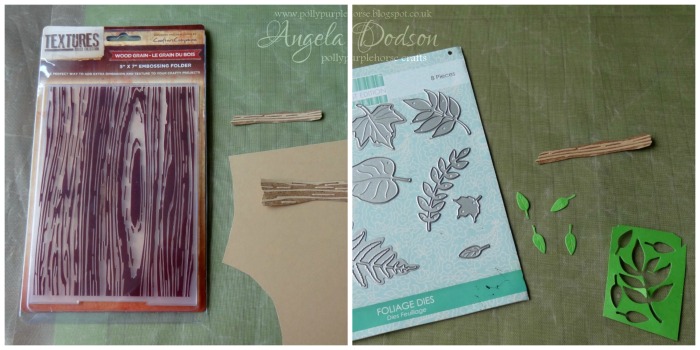
Take a woodgrain embossing folder and add memento rich cocoa ink to one side of the inside, use to emboss a small piece of PMD Buff cardstock. Trim into a small branch shape approx. 3” long. Die cut some small individual leaves from PMD Apple green cardstock.
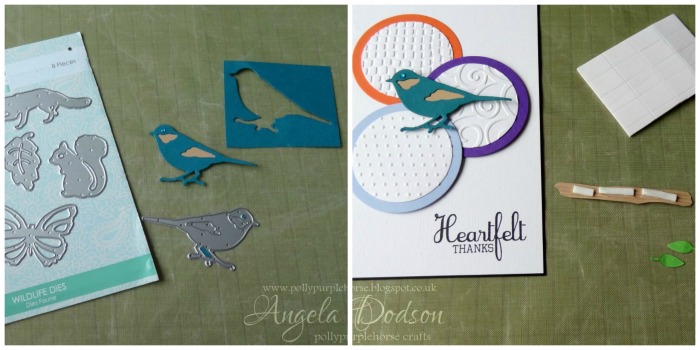
Die cut a bird shape from PMD Teal and buff card and add to card front using 3D foam pads, positioning across the overlapping circles. Add 3D foam pads to back of branch.

Adhere branch onto card front, positioning it so the bird looks to be perching on it. Add small pieces of 3D foam to the back of each leaf and add to branch in pairs. A small dab of clear drying glue on the stalks to adhere them under the branch. Score & Fold and A4 sheet of Papermilldirect plain White cardstock, trim down to create a standard 5” x 7” card base and attach completed panel using a combination of double sided tape and glue.

This is a great way to make use of those scraps of gorgeous bright papermilldrect cardstocks and the embossing adds lots of extra interest, the use of white linen gives a lovely texture and plenty of white space which adds impact to those bright colours. I felt my design needed a 'sentiment' to finish it off, but you could make this card for all occasions simply by changing the sentiment and / or centre element.
Materials Used:
White Linen Card, Plain White Card – Papermilldirect
Swiss Dots, Divine Swirls, & Tiny Mosaic Embossing Folders – Cuttlebug
Woodgrain Textures Embossing Folder – Crafters Companion
Circles #65755 Die set – Sizzix
Wildlife Dies set #FEDIE053 – First Edition
Foliage Die Set #FEDIE019 – First Edition
Sentiment Stamp – Clearly Besotted
Inks: Jet Black Archival Inkpad, Rich Cocoa Memento Inkpad
Adhesives: D/S Tape, 3D Foam Pads, Cosmic Shimmer glue


1 thought on “Heartfelt Thanks Card - Step By Step Tutorial”
Elsa Dowling
02nd November 2016 at 7:56 a.m.